[ad_1]

A previous TechRepublic tutorial, How to calculate profit margin in Microsoft Power BI using a calculated column, shows you how to calculate profit margin as a percentage by adding a calculated column to an existing table. This is a helpful technique for calculating profit margin in Power BI, but sometimes you won’t want to add a calculated column. When this is the case, you can use custom measures to return the profit as both a currency value and a percentage.
SEE: Hiring kit: Microsoft Power BI developer (TechRepublic Premium)
In this tutorial, I’ll show you how to use DAX to create two profit measures in an Adventure Works visual. We’ll also discuss why you might choose to use measures instead of calculated columns.
I’m using Microsoft Power BI on a Windows 10 64-bit system. You can download the demonstration .pbix file, Adventure Works Sales, from GitHub. Once downloaded, double-click the .pbix file to open it in Power BI and follow along or use a .pbix file of your own. If you want a sneak peek at the final results, check out this demo file.
Jump to:
How to know when to use a measure instead of a calculated column
Sometimes it doesn’t matter whether you use a calculated column or a custom measure to return profit values. When it does matter, you’ll want to make an informed decision. Let’s begin with a brief description of both approaches and their best use cases:
- Calculated column: The result of a DAX expression that evaluates row by row (row context) and is part of the model.
- Custom measure: A calculation that usually works as an aggregate; Power BI evaluates them on the fly, as needed, and results aren’t saved to the model.
SEE: How to tackle DAX basics in Microsoft Power BI (TechRepublic)
Deciding whether to use calculated columns or customer measures isn’t as complicated as it might sound. If the calculation evaluates data row by row, a calculated column is the best choice. If the calculation is evaluating multiple records or you plan to use it to filter data, a measure is the better option.
Preparing your sales table and expressions
Now that you’ve decided a custom measure approach is best for your project, the next step is finding the right DAX expression to use. There are three types of profit to consider: Gross, operating and net. Both measures we’ll be calculating are for a gross margin, which subtracts the costs of goods and doing business from revenue:
Profit = Sales - Expenses
To return profit margin as a percentage, use the following formula:
% Profit Margin = (Sales - Expenses) / Expenses
Fortunately, adding measures to calculate profit margin is easy. The first thing you’ll want to review is the sales table, shown in Figure A, because we’ll be adding both measures to this simple table visual.
Figure A
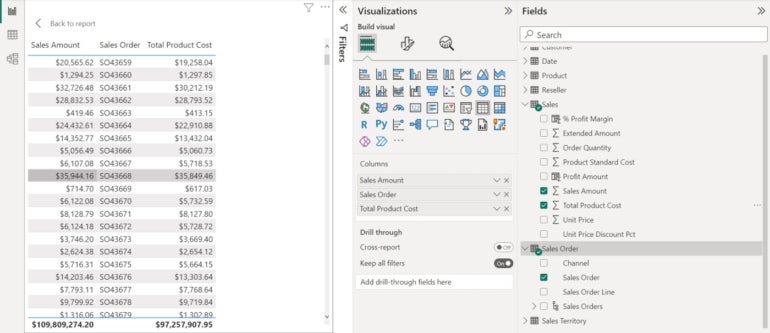
To start, the table displays three fields: Sales Amount, Sales Order and Total Product Costs. We’re including the Sales Order field from the Sales Order table so we can see the profit for each order — that’s our aggregate, because an order may have more than one item or record.
To create this sales table visual, do the following:
- Click Table in the Visualizations pane.
- In the Fields pane, expand the sales table and check the Sales Amount and Total Product Costs fields.
- Expand the Sales Order table and check the Sales Order field.
We are fortunate that the sales table includes the Total Product Costs field. When evaluating costs for your own project, you might have to go on a scavenger hunt to get all the details. It’s important to not assume that an existing “costs” field contains everything you need. For simplicity’s sake — and because we don’t have any other values to discover in our demonstration file — we are confident that the Total Product Costs values are comprehensive.
You might also notice the two calculated columns, which return the profit and profit margin. They are there for your convenience, so you can inspect them and explore further as needed. However, we don’t need them for this particular demonstration.
How to create a measure to return profit
Now, let’s create a measure to calculate profit with the following steps:
- If the table visual is selected, click anywhere outside of it to remove the selection.
- Click the sales table in the Fields pane.
- Click the Table Tools menu if necessary.
- Click New Measure, and Power BI will add a measure to the Sales table using a generic name.
- Enter the following DAX expression in the formula bar:
Profit Amount Measure = SUM(Sales[Sales Amount]) - SUM(Sales[Total Product Cost])
- Click the checkmark to the left of the formula to commit the measure.
As you can see in Figure B, Power BI renames the generic measure using the first part of the expression Profit Amount Measure. At this time, you might be wondering about the DAX SUM functions.
Figure B
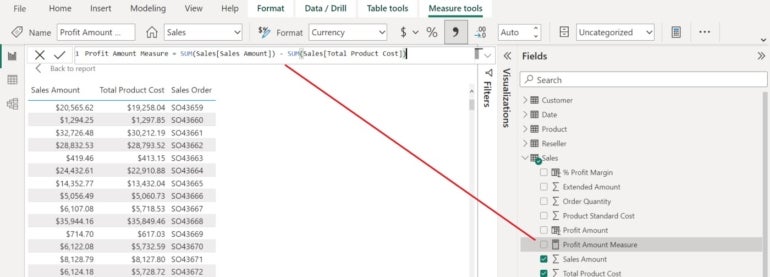
Remember, measures work with aggregates or columns and calculated columns work with rows. The SUM function is our aggregate function. This expression sums the Sales Amount values and subtracts the sum of the Total Product Cost values from the first total for each order.
Adding your measure to the visual
To add the measure to the visual, simply select the table visual and then check Profit Amount Measure in the Fields pane. The results are shown in Figure C. The magic is the relationship between the two tables. Because the visual includes the Sales Order value, the SUM functions can total the sales amount and costs for each order.
Figure C
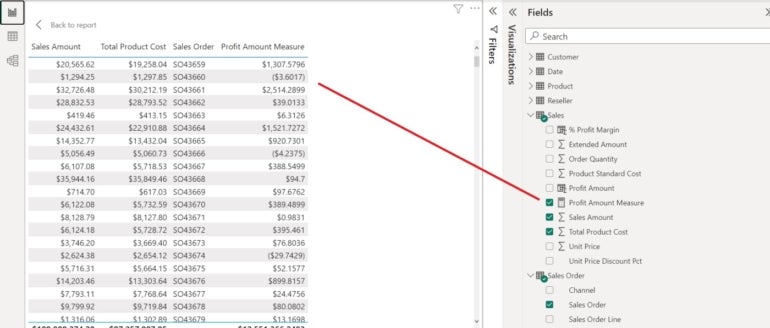
You don’t have to use the Sales Order field to define the SUM aggregate. You might want to see profit by a date, perhaps a month or even a year. Simply add the related field, and Power BI does all the rest.
A relationship already exists between the two tables, as shown in Figure D. Without this relationship, the measure won’t work.
Figure D
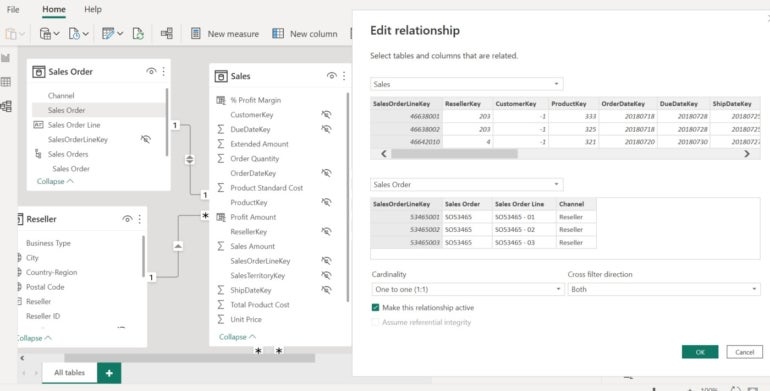
I can’t stress this too strongly: When you apply these measures to your own work, you might need to consider the relationships between tables to get the results you want. If everything you need is in the same table, relationships are irrelevant.
Adding a second measure to calculate profit margin
Now, let’s add a second measure to calculate profit margin. Using the instructions above, create a new measure, except use the following expression when you reach step five:
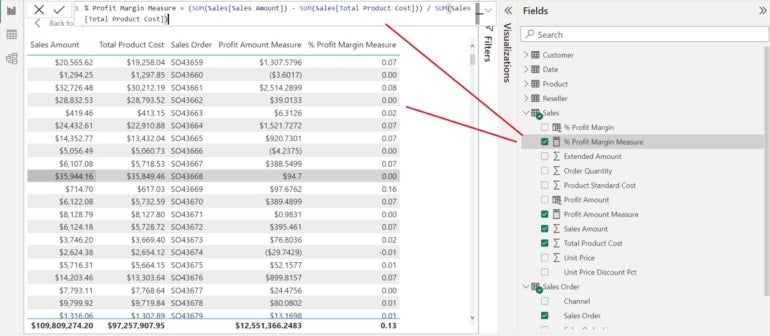
% Profit Margin Measure = (SUM(Sales[Sales Amount]) - SUM(Sales[Total Product Cost])) / SUM(Sales[Total Product Cost])
Figure E shows the % Profit Margin Measure added to the table visual. As with the first measure, you can trade the Sales Order field for another related field or another field in the Sales table if that will produce more meaningful results for your particular goals.
Figure E
You now have two measures: One for calculating profit and one for calculating profit margin. Both measures are easy to create and can be added to other visuals.
Read next: Best business intelligence tools (TechRepublic)
[ad_2]
Source link