[ad_1]
Power BI offers a lot of formatting flexibility for filters, but it’s nice when those formats match the visualizations. We’ll show you how.

Power BI reports have default formats that you’ll probably want to change occasionally for branding purposes. Regardless of why you change default report formats, you’ll want to use those new formats in other elements, such as filters. Making this change provides a nice, cohesive look to your report and tones down the busy factor, which can distract end users.
SEE: Hiring kit: Microsoft Power BI developer (TechRepublic Premium)
In this tutorial, I’ll show you how to access and change filter format properties in Power BI. We’ll review a simple visualization to discern its formatting and then apply those same formats to an accompanying filter. I’m using Power BI Desktop on a Windows 10 64-bit system. You can download a Microsoft Power BI demonstration file for this tutorial.
Jump to:
How to match the Filters pane and report formatting
Adding a filter is automatic. When you add a visual to the report, Power BI adds a filter to the Filters pane that includes every field in the visual. To build a custom filter, drag other fields into buckets on the Filters pane, which you can distribute to the visual, page or even report level.
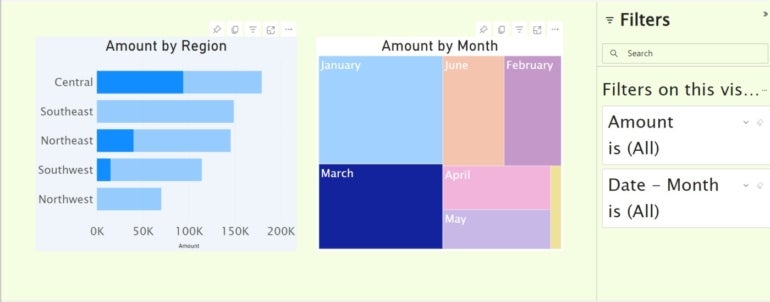
Figure A shows a simple published report with two visuals and a filter. As you can see, the Filters pane doesn’t match the report. It isn’t horrible — you can leave it that way, or you can update the pane’s formatting to match the visuals.
Figure A
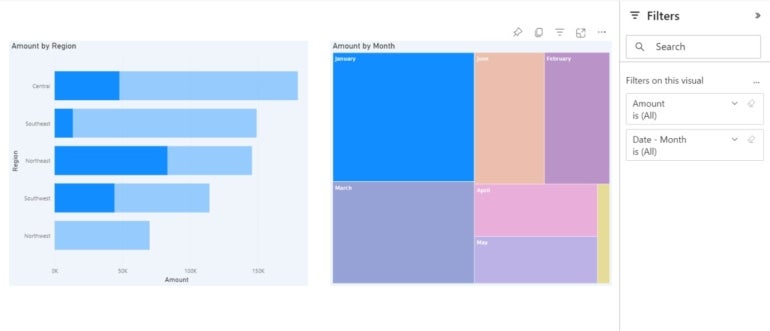
If you click the visual to the right, the Fields pane displays the fields this visual is based on, Amount and Date — Month. If you click the visual to the left, the Fields pane displays Amount and Region. These are the default filters based on each visual’s underlying fields. For our purposes, we don’t need other filtering fields, but your report might have one or more.
In Power BI Desktop, you can use the Visualizations pane to find the visual formats you want to use on the Filters pane. It would be great if you could use Format Painter, but it doesn’t work that way. If you’re familiar with Power BI’s default settings, you can see with a glance that this report has a few custom formats:
- The background is always white by default, so you might want the Filters pane to use the same background color as the report.
- The text is larger than usual, so let’s find the font and font size used in the visuals — they’re the same for the visual title and the axis categories.
There could be many other formats to match, but we’re keeping things simple on purpose. Once you know where to find format settings, matching them is easy.
How to document the format properties in Power BI
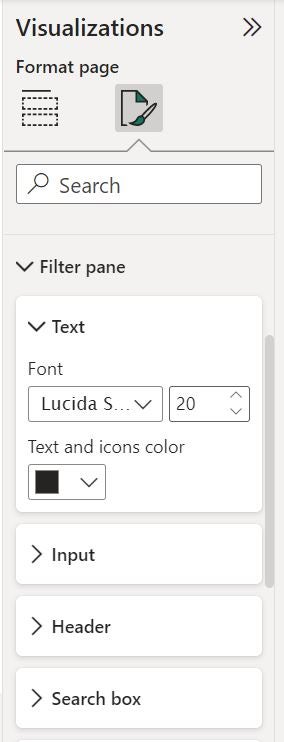
Now let’s find the settings and document them. To do so, click the treemap visual on the right and make sure the Visualizations pane is open. At the top of the Visualizations pane, click the Format option. Click Visuals in the submenu, and Power BI displays four formatting sections, as you can see in Figure B.
Figure B
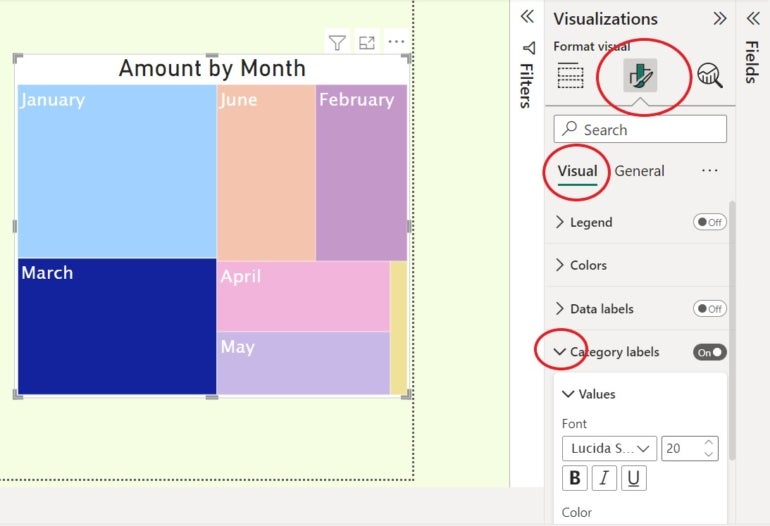
You might think that the background color is in the Color section, but that section lists the colors displayed by the chart series. The other possibility is Category Labels, where you’ll find Values. You can see that the values in this visual are using Lucida Sans Unicode at 20 points. Make a note of that if it will be necessary for you to remember later.
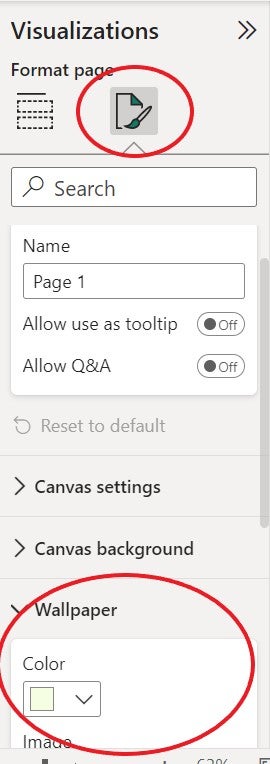
Now that we know how to format the text, let’s find that background color. To do so, click the background and then choose General from the submenu in the Visualizations pane. Doing so updates the sections, as you can see in Figure C. Expand the top section, Page Properties, and then open the Wallpaper subsection to find the background color.
Figure C
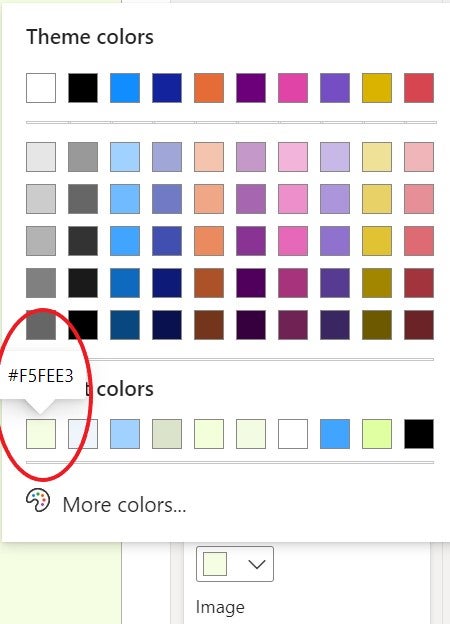
At this point, you’ll have to dig a bit deeper to make sure you match the exact color as follows:
- Click the color dropdown.
- Hover over the thumbnail of the match color. Doing so displays the color’s identification, #F5FEE (Figure D). For our purposes, click it. This will make more sense in the next section.
Figure D
Now, let’s use what we’ve learned to format the Filters pane.
How to format the Filters pane
We only have three formats to change for the Filters pane: The font, the font size, and the background or wallpaper color. There’s no Format option on the Filters pane; the settings are in the Visualizations pane.
To change the Filters pane format settings, click anywhere inside the report’s background, and then do the following:
- Click Format in the Visualizations pane, as you did before.
- Expand the Filter Pane option.
- Change the Font and Font Size settings to Lucida Sans Unicode and 20, respectively (Figure E).
Figure E
- Expand the Background section.
- Click the Color dropdown and choose #F5FEE, which is easy to find in this instance — you don’t need the color’s identification at all. This palette remembers the last setting you selected, and it’s still selected from when you clicked it in the last section. All you have to do is click it in the palette.
Open the Filters pane, and you’ll see that it uses the settings you changed, as shown in Figure F.
Figure F

You might want to reduce the font size a bit, but that’s up to you. Figure G shows the formatted Filters pane, published.
Figure G
What formats can I change for the Filters pane?
You can’t change the entire look of the Filters pane. These are the elements you can change:
- Background color
- Background transparency
- Border on or off
- Border color
- Title and header font, color and text size
When reviewing the visuals, keep this list in mind so you don’t spend time looking for settings that you can’t change. Matching the format of the Filters pane to the visuals or report won’t make filtering easier, but matching reports and panes improves consistency, and it improves the Microsoft Power BI experience for end users.
Read next: Best business intelligence tools (TechRepublic)
[ad_2]
Source link