[ad_1]

The Logical Volume Manager commands in Linux are one of the handiest tools I’ve used for adding new disk or expanding existing volumes. It’s easy to do this on the fly without requiring downtime or rebooting, though I always recommend taking a full backup of all data on any existing volumes first, as well as taking a snapshot of the virtual machines involved.
SEE: 40+ open source and Linux terms you need to know (TechRepublic Premium)
In this tutorial, I’ll show you how to expand and shrink a volume using LVM. Read to learn more.
Jump to:
Expanding a volume using LVM
I’m going to walk through a set of steps I performed recently to expand the /home volume on a server which was set up with 1 GB of space. This was on a test server, but I decided to expand the volume to add another 10 GB just to be safe.
Since we use VMWare exclusively for our servers, this scenario takes place in a vSphere environment, but the steps involved would be the same if you added a disk to a physical server.
First, I logged into the server, became root and then examined the disks present by running:
lsblk
NAME                   MAJ:MIN RM  SIZE RO TYPE MOUNTPOINT

sda                      8:0    0  200G  0 disk

├─sda1                   8:1    0    1G  0 part /boot

├─sda2                   8:2    0   49G  0 part

│ ├─rhel-root          253:0    0   20G  0 lvm  /

│ ├─rhel-swap          253:1    0    4G  0 lvm  [SWAP]

│ ├─rhel-home          253:3    0    1G  0 lvm  /home

│ ├─rhel-var           253:4    0   10G  0 lvm  /var

│ ├─rhel-var_log       253:5    0   20G  0 lvm  /var/log

│ ├─rhel-var_opt       253:6    0    3G  0 lvm  /var/opt

│ ├─rhel-var_tmp       253:7    0    3G  0 lvm  /var/tmp

│ ├─rhel-usr_local     253:8    0   10G  0 lvm  /usr/local

│ ├─rhel-var_log_audit 253:9    0 1012M  0 lvm  /var/log/audit

│ ├─rhel-opt           253:10   0   65G  0 lvm  /opt

│ ├─rhel-opt_fireeye   253:11   0    2G  0 lvm  /opt/fireeye

│ ├─rhel-besclient     253:12   0    8G  0 lvm  /var/opt/BESClient

│ ├─rhel-opt_encase    253:13   0    2G  0 lvm  /opt/encase

│ └─rhel-tmp           253:14   0   15G  0 lvm  /tmp

sdb                      8:16   0  850G  0 disk

└─appvg-vaplv          253:2    0  850G  0 lvm  /opt/vap
I checked /etc/fstab and established that /dev/mapper/rhel-home is the /home mount point. It is on the sda2 partition on the sda physical disk and is an XFS filesystem as opposed to EXT2/3/4.
I then ran vgs to display the volume groups:
VG    #PV #LV #SN Attr   VSize    VFree

appvg   1   1   0 wz--n- <850.00g     0

rhel    2  14   0 wz--n-  198.99g 35.00g
This established that the volume group to work with was rhel.
I then logged into the vSphere console to add a new disk via these steps:
- Right-click the VM.
- Choose Edit Settings.
- Choose Add New Device.
- Choose Hard Disk.
- Add a 10 GB disk as shown (Figure A).
Figure A
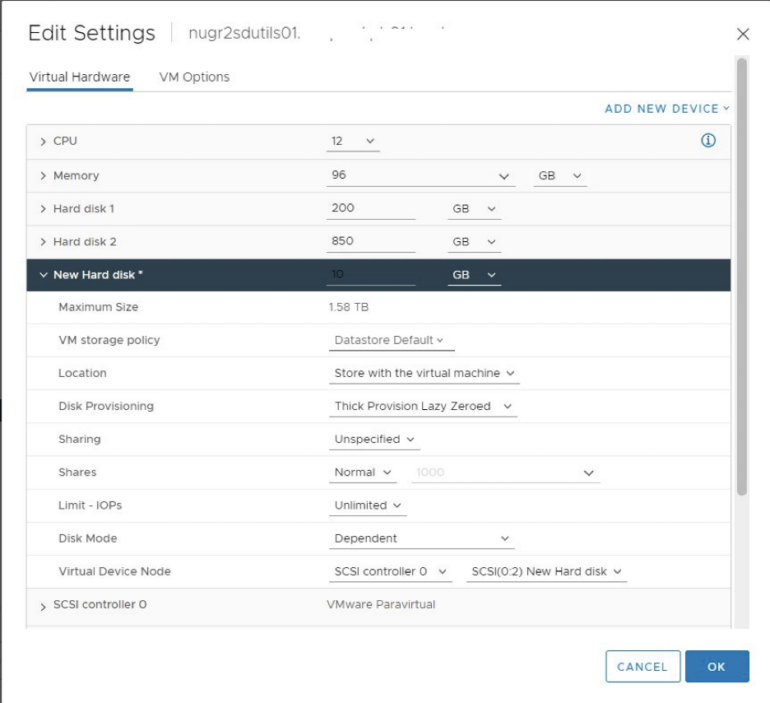
Note that it is possible to expand an existing volume in certain cases — such as if there are no snapshots — then add the expanded space to a volume group and assign it to a logical volume. However, I consider this to be riskier than adding a new disk outright, as there is a chance that human error might adversely impact existing data. It’s much cleaner to work with a new disk and empty associated partition. The OS doesn’t care which disks it’s using for logical volumes; that is the beauty of LVM.
I then ran lsblk again:
NAME                   MAJ:MIN RM  SIZE RO TYPE MOUNTPOINT

sda                      8:0    0  200G  0 disk

├─sda1                   8:1    0    1G  0 part /boot

├─sda2                   8:2    0   49G  0 part

│ ├─rhel-root          253:0    0   20G  0 lvm  /

│ ├─rhel-swap          253:1    0    4G  0 lvm  [SWAP]

│ ├─rhel-home          253:3    0    1G  0 lvm  /home

│ ├─rhel-var           253:4    0   10G  0 lvm  /var

│ ├─rhel-var_log       253:5    0   20G  0 lvm  /var/log

│ ├─rhel-var_opt       253:6    0    3G  0 lvm  /var/opt

│ ├─rhel-var_tmp       253:7    0    3G  0 lvm  /var/tmp

│ ├─rhel-usr_local     253:8    0   10G  0 lvm  /usr/local

│ ├─rhel-var_log_audit 253:9    0 1012M  0 lvm  /var/log/audit

│ ├─rhel-opt           253:10   0   65G  0 lvm  /opt

│ ├─rhel-opt_fireeye   253:11   0    2G  0 lvm  /opt/fireeye

│ ├─rhel-besclient     253:12   0    8G  0 lvm  /var/opt/BESClient

│ ├─rhel-opt_encase    253:13   0    2G  0 lvm  /opt/encase

│ └─rhel-tmp           253:14   0   15G  0 lvm  /tmp

sdb                      8:16   0  850G  0 disk

└─appvg-vaplv          253:2    0  850G  0 lvm  /opt/vap

sdc                      8:32   0   10G  0 disk
Here we see the new 10 GB disk added as sdc.
I then ran fdisk to add a primary partition to the disk so the file system would recognize it:
fdisk -u -c /dev/sdc
I pressed n for new partition, p for primary, hit enter twice to confirm the defaults and then hit w to write the changes, as follows:
Welcome to fdisk (util-linux 2.23.2).

Changes will remain in memory only, until you decide to write them.

Be careful before using the write command.

Device does not contain a recognized partition table

Building a new DOS disklabel with disk identifier 0xf9417ab7.

Command (m for help):
I pressed n to create a new partition.
Partition type:

   p   primary (0 primary, 0 extended, 4 free)

   e   extended

Select (default p):
I pressed p to create a primary partition.
Partition number

(1-4, default 1):
I hit enter to accept the default of 1.
First sector (2048-20971519, default 2048):
I hit enter to accept the default of 2048.
Using default value 2048
Last sector, +sectors or +size{K,M,G} (2048-20971519, default 20971519):
I hit enter to accept the default of 20971519.
Using default value 20971519

Partition 1 of type Linux and of size 10 GiB is set

Command (m for help):
I pressed w to write the changes.
The partition table has been altered!

Calling ioctl() to re-read partition table.

Syncing disks.
The next step was to create the physical volume from the new partition by running:
pvcreate /dev/sdc1
Physical volume "/dev/sdc1" successfully created.
Then I extended the rhel volume group to include the new partition:
vgextend rhel /dev/sdc1
Volume group "rhel" successfully extended
Running vgs again confirmed the addition of 10 GB:
VG    #PV #LV #SN Attr   VSize    VFree

appvg   1   1   0 wz--n- <850.00g     0

rhel    3  14   0 wz--n- <208.99g 45.00g
Extending the logical volume came next:
lvextend -l 100%FREE /dev/mapper/rhel-home
You can also use lvextend -r -L +10G /dev/mapper/rootvg-rhel_home to just add the 10 GB of space if you don’t want to award the full amount to a given logical volume.
In my example, the following was returned:Size of logical volume rhel/home changed from 1.00 GiB (256 extents) to 11.00 GiB (2816 extents).
Logical volume rhel/home successfully resized.
The last step was to grow the file system using this command:
xfs_growfs /dev/mapper/rhel-home
meta-data=/dev/mapper/rhel-home  isize=512    agcount=4, agsize=65536 blks

         =                       sectsz=512   attr=2, projid32bit=1

         =                       crc=1        finobt=0 spinodes=0

data     =                       bsize=4096   blocks=262144, imaxpct=25

         =                       sunit=0      swidth=0 blks

naming   =version 2              bsize=4096   ascii-ci=0 ftype=1

log      =internal               bsize=4096   blocks=2560, version=2

         =                       sectsz=512   sunit=0 blks, lazy-count=1

realtime =none                   extsz=4096   blocks=0, rtextents=0

data blocks changed from 262144 to 2883584
Running lsblk again confirmed the /home volume is now 11 GB:
NAME                   MAJ:MIN RM  SIZE RO TYPE MOUNTPOINT

sda                      8:0    0  200G  0 disk

├─sda1                   8:1    0    1G  0 part /boot

├─sda2                   8:2    0   49G  0 part

│ ├─rhel-root          253:0    0   20G  0 lvm  /

│ ├─rhel-swap          253:1    0    4G  0 lvm  [SWAP]

│ ├─rhel-home          253:3    0   11G  0 lvm  /home

│ ├─rhel-var           253:4    0   10G  0 lvm  /var

│ ├─rhel-var_log       253:5    0   20G  0 lvm  /var/log

│ ├─rhel-var_opt       253:6    0    3G  0 lvm  /var/opt

│ ├─rhel-var_tmp       253:7    0    3G  0 lvm  /var/tmp

│ ├─rhel-usr_local     253:8    0   10G  0 lvm  /usr/local

│ ├─rhel-var_log_audit 253:9    0 1012M  0 lvm  /var/log/audit

│ ├─rhel-opt           253:10   0   65G  0 lvm  /opt

│ ├─rhel-opt_fireeye   253:11   0    2G  0 lvm  /opt/fireeye

│ ├─rhel-besclient     253:12   0    8G  0 lvm  /var/opt/BESClient

│ ├─rhel-opt_encase    253:13   0    2G  0 lvm  /opt/encase

│ └─rhel-tmp           253:14   0   15G  0 lvm  /tmp

sdb                      8:16   0  850G  0 disk

└─appvg-vaplv          253:2    0  850G  0 lvm  /opt/vap

sdc                      8:32   0   10G  0 disk

└─sdc1                   8:33   0   10G  0 part

  └─rhel-home          253:3    0   10G  0 lvm  /home
Shrinking a volume using LVM
Shrinking a volume is entirely different compared to expanding a volume. There are a few considerations at stake.
XFS file systems cannot be shrunk; the only solution is to back up the data, delete the volume, create and configure a smaller volume, and restore the data to it.
EXT2/EXT3/EXT4 file systems can be shrunk, conversely, but there are also VMWare entanglements when it comes to shrinking disks. Snapshots can interfere with the process, requiring them to be deleted, and thick provisioned disks can be tricky to shrink. VMWare provides a good KB article here which entails Vmware Converter and/or the vmkfstools command.
For the purpose of this LVM article, I’ll focus on how an EXT2/3/4 volume can be shrunk — assuming the VMWare disk has been successfully reduced in size, or assuming you wish to keep the VMWare disk size as-is and apportion the space to another logical volume.
Shrinking a root volume is going to be the trickiest operation. That is the logical volume mounted to /, and since this process requires unmounting a volume to shrink it, that is not possible. You must boot from a Live CD from which the OS is not actually running. You might need to run vgchange -a y for the Live CD to recognize the logical volumes so you can proceed.
Shrinking a non-root volume is much cleaner; in this case, to match the examples shown above, I would run umount /home to proceed.
The following steps should now apply to both a root or non-root volume.
Run a file system check on the LVM volume in order to reduce the risk of data corruption:
e2fsck -fy /dev/mapper/rhel-home
The -f flag forces the check to proceed even if the file system appears free of any issues, and the -y answers yes to all questions.
The command below will shrink the /home logical volume from 11 GB to 5GB in size. Note that you must have sufficient free space to perform this:
resize2fs /dev/mapper/rhel-home 5G
Now you can shrink the size of the logical volume with the lvreduce command.
To reduce a logical volume to a desired size, use the -L flag then specify the desired size:
lvreduce -L 5G /dev/mapper/rhel-home
To reduce a logical volume by a certain size, use the -L flag and a dash in front of the desired size:
lvreduce -L -5G /dev/mapper/rhel-home
Once you execute this command, you’ll be prompted to confirm by answering ‘y’ and pressing enter. You now need to run resize2fs on the volume as shown:
resize2fs /dev/mapper/rhel-home
You then need to mount the volume. If this entailed a root volume, just reboot the system to load the primary Linux operating system. If it’s a non-root volume, run mount -a, assuming you have the configuration set up in /etc/fstab — otherwise, specify the logical volume and where to mount to as shown:
mount /dev/mapper/rhel-home /home
Finally, check the space of the volume with the df command to confirm it has been decreased as expected. I also recommend running another file system health check with this command:
e2fsck -fy /dev/mapper/rhel-home
A useful framework for configuring disks
Working with LVM to perform disk and volume operations is quick, easy and reliable. I have performed on-the-fly disk management actions and never once experienced a technical issue much less an operating system crash or data loss.
For more information on LVM, check out the Complete Beginners Guide to LVM by linuxhandbook.com.
[ad_2]
Source link