[ad_1]
Controlling what users can do in your project management tools can be a chore. Orangescrum makes this easier with the help of Role Groups.

One very important task a project manager admin can take on is limiting user access to the bare minimum needed to get their job done. Give a user too much control and they could unintentionally wreak havoc on your project; give a user too little control and they won’t be able to complete their work.
SEE: Hiring kit: Project manager (TechRepublic Premium)
Orangescrum gives you all the power you need to manage user role and create Role Groups to make access management even easier. For example, you could create a new Role Group for a specific department, set specific actions that the group can take and then assign users to the group.
What you’ll need to create a Role Group with Orangescrum
The only thing you’ll need for this to work is a valid Orangescrum account.
This will not work with the community edition, so if you’re hosting Orangscrum on your own data center or third-party host, you won’t find this feature, as it’s only available via the cloud edition.
With your Orangescrum cloud account ready, let’s create a Role Group.
How to create your first Role Group
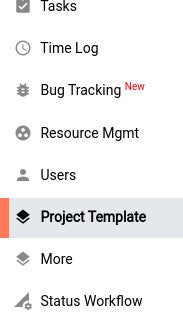
Log in to your Orangescrum account as a user with admin privileges. On the main page, click Project Template in the left navigation (Figure A).
Figure A
In the resulting window (Figure B), click User Role Mgt at the top.
Figure B

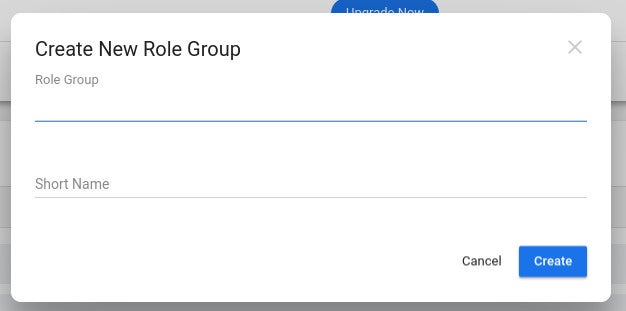
Next, click the + button at the bottom right and then click Create New Role Group. In the pop-up window (Figure C), give the new Role Group a name and short name. Click Create.
Figure C
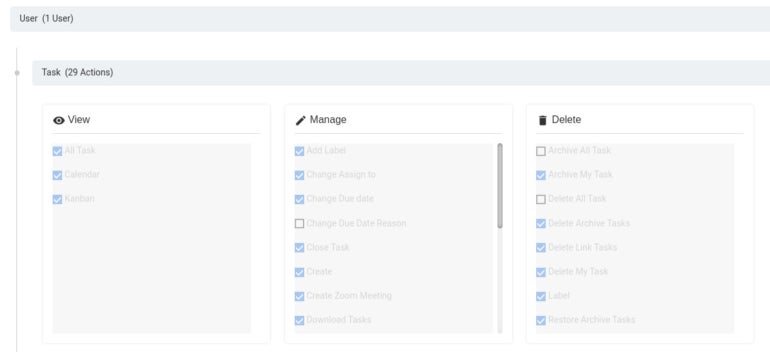
You should then see the new page for your Role Group. If you expand Default Roles, you’ll see five different Roles that are pre-built. Expand any one of them to see how they are defined (Figure D).
Figure D
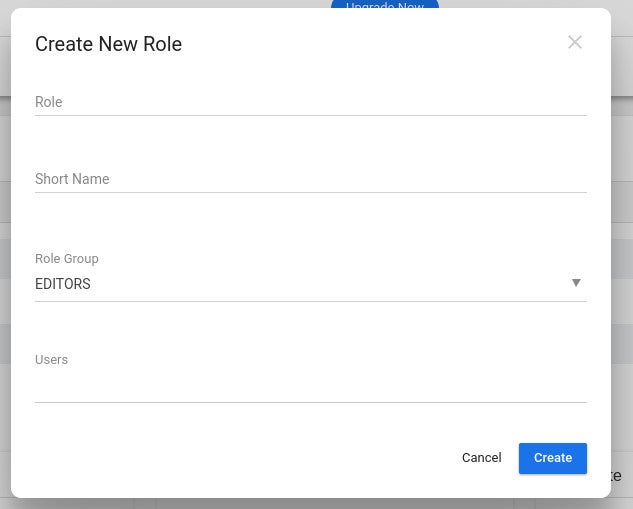
You cannot edit these actions. Instead, you create a new Role by clicking + associated with Role Group. In the resulting pop-up (Figure E), give the new Role a name and short name, then add users.
Figure E
When finished, click Create. Once the Role has been created, click to expand it and then expand any of the available actions, where you can then customize exactly what that Role Group has permission to do (Figure F).
Figure F
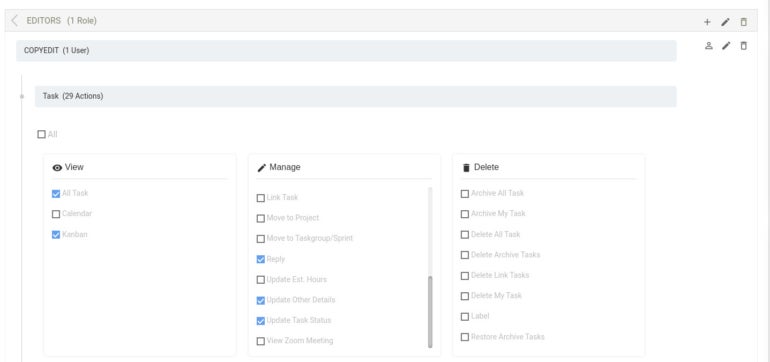
After customizing all of the actions for the Role Group, scroll down and click Save Changes. At this point, the users you’ve added to the new Role Group will have those specific permissions. As long as you limit those users to only that Role Group, you have successfully limited them to what they can do.
Simplified user management
That’s all there is to creating Role Groups with Orangescrum. If you have a large organization with different departments that require different project management permissions, Orangescrum greatly simplifies that process for you. Give this feature a try and see if it doesn’t make your project management admin life a bit easier.
Subscribe to TechRepublic’s How To Make Tech Work on YouTube for all the latest tech advice for business pros from Jack Wallen.
[ad_2]
Source link