[ad_1]
Docker Swarm is one of the easiest container clusters you can deploy. Within minutes you can have your cluster up and running for high availability, failover and scalability. Once up and running, you can then deploy containers to the swarm to take advantage of the cluster. For instance, you could deploy a service that can scale to meet whatever demand comes its way.
SEE: 40+ open source and Linux terms you need to know (TechRepublic Premium)
That’s exactly what I’m going to show you. Here, we’ll first install the Docker Swarm and then deploy a service to the new cluster such that it can be scaled to whatever degree that suits the needs of your company.
What you’ll need
I’ll be demonstrating on a cluster comprised of one controller and two nodes, all of which will run on Ubuntu Server 20.04. If you’re using a different Linux distribution, you may need to alter the Docker installation steps (but nothing more).
With that said, let’s get swarming.
How to install Docker
The first thing we must do is install Docker. Make sure to follow these same steps on your controller and however many nodes you plan to deploy.
Log into your server and update apt with:
sudo apt-get update
Next, install the necessary dependencies with the command:
sudo apt-get install ca-certificates curl gnupg lsb-release -y
Add the official Docker GPG key:
curl -fsSL https://download.docker.com/linux/ubuntu/gpg | sudo gpg --dearmor -o /usr/share/keyrings/docker-archive-keyring.gpg
Add the Docker stable repository with:
echo "deb [arch=$(dpkg --print-architecture) signed-by=/usr/share/keyrings/docker-archive-keyring.gpg] https://download.docker.com/linux/ubuntu $(lsb_release -cs) stable" | sudo tee /etc/apt/sources.list.d/docker.list > /dev/null
Install Docker Engine with:
sudo apt-get update
sudo apt-get install docker-ce docker-ce-cli containerd.io -y
Start and enable Docker with:
sudo systemctl enable --now docker
Add your user to the docker group with the command:
sudo usermod -aG docker $USER
Make the system aware of the new group with:
newgrp docker
Repeat the above steps for all your nodes.
Back at the Docker controller, initialize the swarm with:
docker swarm init --advertise-addr SERVER
Where SERVER is the IP address for the Docker Controller.
You will then be presented with the join command that will look something like this:
docker swarm join --token SWMTKN-1-46uxtlbe3wrelly1fe5e65p1wdvg95bcjo48izvptpwof62rdo-42yl4jprovhng56sgxmyv7arv 192.168.1.13:2377
Copy that command and run it from all of your nodes. Once you’ve done that, you can verify the join by issuing the following command on the controller:
docker info
You should see output similar to this:
Swarm: active
NodeID: wb44efzwy68x9gek45ee1nbnb
Is Manager: true
ClusterID: vjec4hz1sjj535x9w0mspox87
Managers: 1
Nodes: 3
Default Address Pool: 10.0.0.0/8
SubnetSize: 24
Data Path Port: 4789
Orchestration:
Task History Retention Limit: 5
How to deploy a service to the swarm
Now, we can deploy a service to our swarm. Let’s keep this simple at first and deploy an NGINX container service that we cannot interact with. To do this, issue the following command on the controller:
docker service create --name nginx_test nginx
To check the status of the service, issue the command:
docker service ls
You should see that our NGINX service has been replicated with output similar to this:
zie1n4nm5es3 nginx_test replicated 1/1 nginx:latest
Our above example is only taking advantage of one of our nodes. What if we want to deploy that service to all three nodes? For that, our command would be something like this:
docker service create --replicas 3 --name nginx3nodes nginx
Issue the command:
docker service ls
You should see our nginx3nodes deployment has been replicated to 3 of 3 nodes with the following output:
y1yu8fq27aab nginx3nodes replicated 3/3 nginx:latest
The service is now taking advantage of all three nodes in our cluster. You can scale down that service to 2 nodes with the command:
docker service scale nginx3nodes=2
Check the status with:
docker service ls
You should now see the nginx service on 2/2 nodes.
Say you have five nodes in your swarm. If you want to scale the service to all five nodes, the command would be:
docker service scale nginx3nodes=5
To delete the service, you’d issue the command:
docker service rm nginx3nodes
Let’s say you want to update the container image in your deployment. A few days have passed since it was originally deployed and you want to make sure you’re using the latest container image available. We’ll assume nginx:latest is an updated container image and to update that service with the new image, you’d issue the command:
docker service update --image nginx:latest nginx3nodes
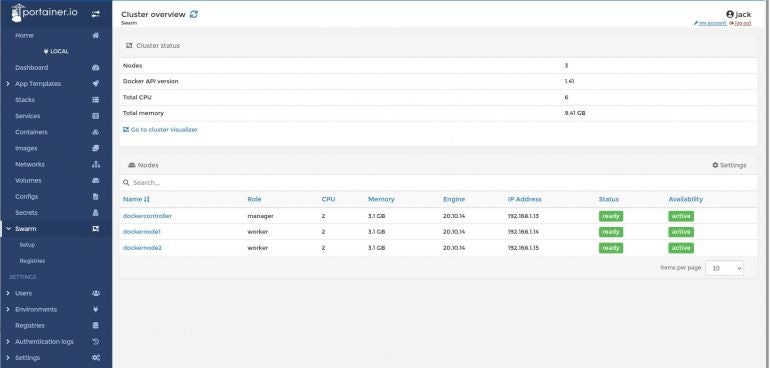
One final note, if you want to more easily manage the swarm, deploy Portainer on the controller with the command:
docker run -d -p 8000:8000 -p 9443:9443 --name=portainer --restart=always -v /var/run/docker.sock:/var/run/docker.sock -v portainer_data:/data portainer/portainer-ce
Once deployed, go to http://SERVER:9443 (Where SERVER is the IP address of the server). After creating an admin user and logging in, you should see Swarm listed in the left navigation. Click that to view your cluster (Figure A).
Figure A
And that’s pretty much the basics of spinning up a Docker Swarm and deploying a service to the nodes.
Subscribe to TechRepublic’s How To Make Tech Work on YouTube for all the latest tech advice for business pros from Jack Wallen.
[ad_2]
Source link